

TP-Link Omada · NetCollab
Omada Captive Portal with NetCollab: Free Wi-Fi, Paid Plans and Vouchers
Build a branded captive portal with TP-Link Omada and NetCollab. Configure VLANs and SSIDs, control guest access, and offer free or paid plans per network.
Make guest Wi-Fi work for your business
Your café, hotel or event venue already pays for an internet connection. With the right guest Wi-Fi setup, you can decide how that connection supports the business: a complimentary hour with a purchase, everyday access for hotel guests, or a paid upgrade with more time and data.
This guide shows you how to combine TP-Link Omada Wi-Fi with a NetCollab captive portal, then offer different plans on each network. You will connect SSIDs to VLANs, add the matching networks in NetCollab, and assign plans with the tiers, prices and allowances that fit your guests. The configuration follows a practical sequence: connect the access point, define the networks, then build the offer.
Omada gives you a convenient place to manage your access points and wireless networks. NetCollab adds guest access control and a captive portal with your branding, where you can present free and paid access plans. Guests get a clear choice; you set the terms of access.
- Keep complimentary access manageable: choose time, speed and data allowances, with application policies suited to your connection.
- Create a paid upgrade: offer higher allowances or broader access through Stripe payments or vouchers.
- Tailor the offer to each audience: choose which plans are available and visible on each NetCollab network.
A café could tie access to a visit. A hotel could offer a complimentary plan alongside a paid upgrade. A remote venue could reserve its free tier for supported maps and messaging services. These are offers you can design around your business and available bandwidth.
Why Omada is a practical foundation—and how to start in the cloud
For a business owner, the appeal of TP-Link Omada is centralized control: manage compatible access points, switches and gateways through one interface, with remote access from a browser or the Omada app. A cloud-hosted controller also removes the need to run a controller server at your venue. That makes it an attractive foundation for managing Wi-Fi across your business. Explore Omada’s cloud management options.
From a new access point to cloud management
For a new, compatible AP, the cloud onboarding flow is short:
- Sign in to Omada Cloud with your TP-Link ID and create your cloud controller and site.
- Power the access point using its supported power supply or PoE connection, and connect its uplink to a network with internet access.
- Add the AP to your site using its serial number, or scan the device code through the Omada app. Follow the adoption prompts.
- Once the AP is connected and managed, configure the site’s Wi-Fi networks from the controller.
Omada offers free Cloud Essentials and licensed Cloud Standard. Check the supported models, firmware and features for the option you select. For a new AP, serial-number adoption expects factory-default configuration and internet access; an existing installation may need a different adoption method. TP-Link provides the device adoption instructions and an Essentials setup overview.
Add NetCollab for the guest experience
Use a NetCollab appliance with User Access Control (UAC) enabled. Both NetCollab Xpresso and NetCollab Pro include this role option. Choose the appliance for your venue’s simultaneous users, bandwidth and role capacity. Omada Cloud manages the Omada equipment; NetCollab manages the guest-access offer.
The walkthrough below starts with an adopted Omada AP and an installed NetCollab appliance. Have administrator access to both. Your AP uplink and any switches between the AP and NetCollab must carry the VLANs you use. Controller labels can vary by version.
Give each network a purpose
Start with your audiences. Guests may need a choice of free and paid access; employees have a different purpose. Omada lets you name the Wi-Fi networks people join—called SSIDs—and associate them with VLANs, which identify separate logical networks.
| Wi-Fi name (SSID) | VLAN | Purpose in this example |
|---|---|---|
Techollab_Guest | 100 | Guest network for the access-plan offer |
Techollab_Staff | 50 | Employee network |
Techollab_Mgmt | No ID displayed | Management Wi-Fi |
You can offer several plans on the same guest network. A complimentary plan and a paid upgrade do not each need their own SSID. Use networks to organize audiences, then use NetCollab tiers and plans to define their access choices. The VLAN IDs and addresses in this guide are examples to adapt to your site.
Configure Omada VLANs and connect your Wi-Fi SSIDs
The Omada side has two main tasks: define the network VLANs and assign the Wi-Fi names to them. Once these match NetCollab, each SSID carries users to the intended network.
1. Create the VLANs under Network Config → LAN
Open Network Config → LAN → VLAN. Create or confirm the networks you need. This site uses Guest VLAN 100 and Staff VLAN 50, alongside Default VLAN 1.
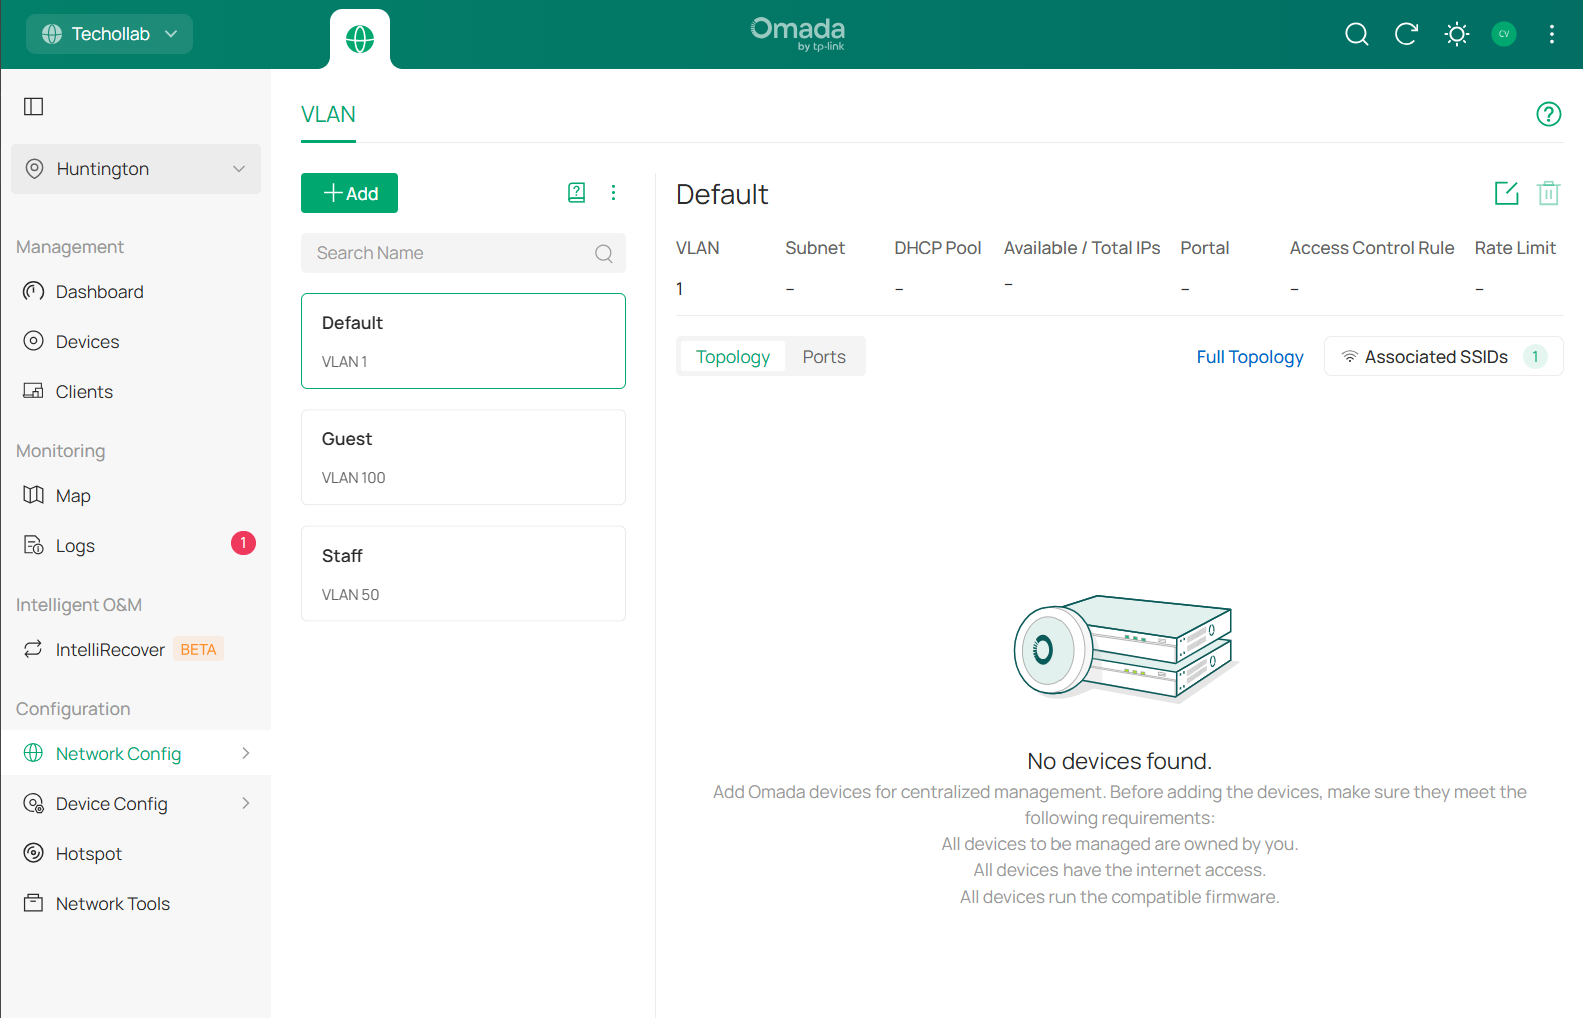
In the Guest LAN settings, enter VLAN 100 and select External Device for DHCP Server Device. In this setup, NetCollab supplies the corresponding client gateway and DHCP configuration. Complete the remaining port-selection and confirmation steps for your site, ensuring the VLAN reaches the AP uplink.
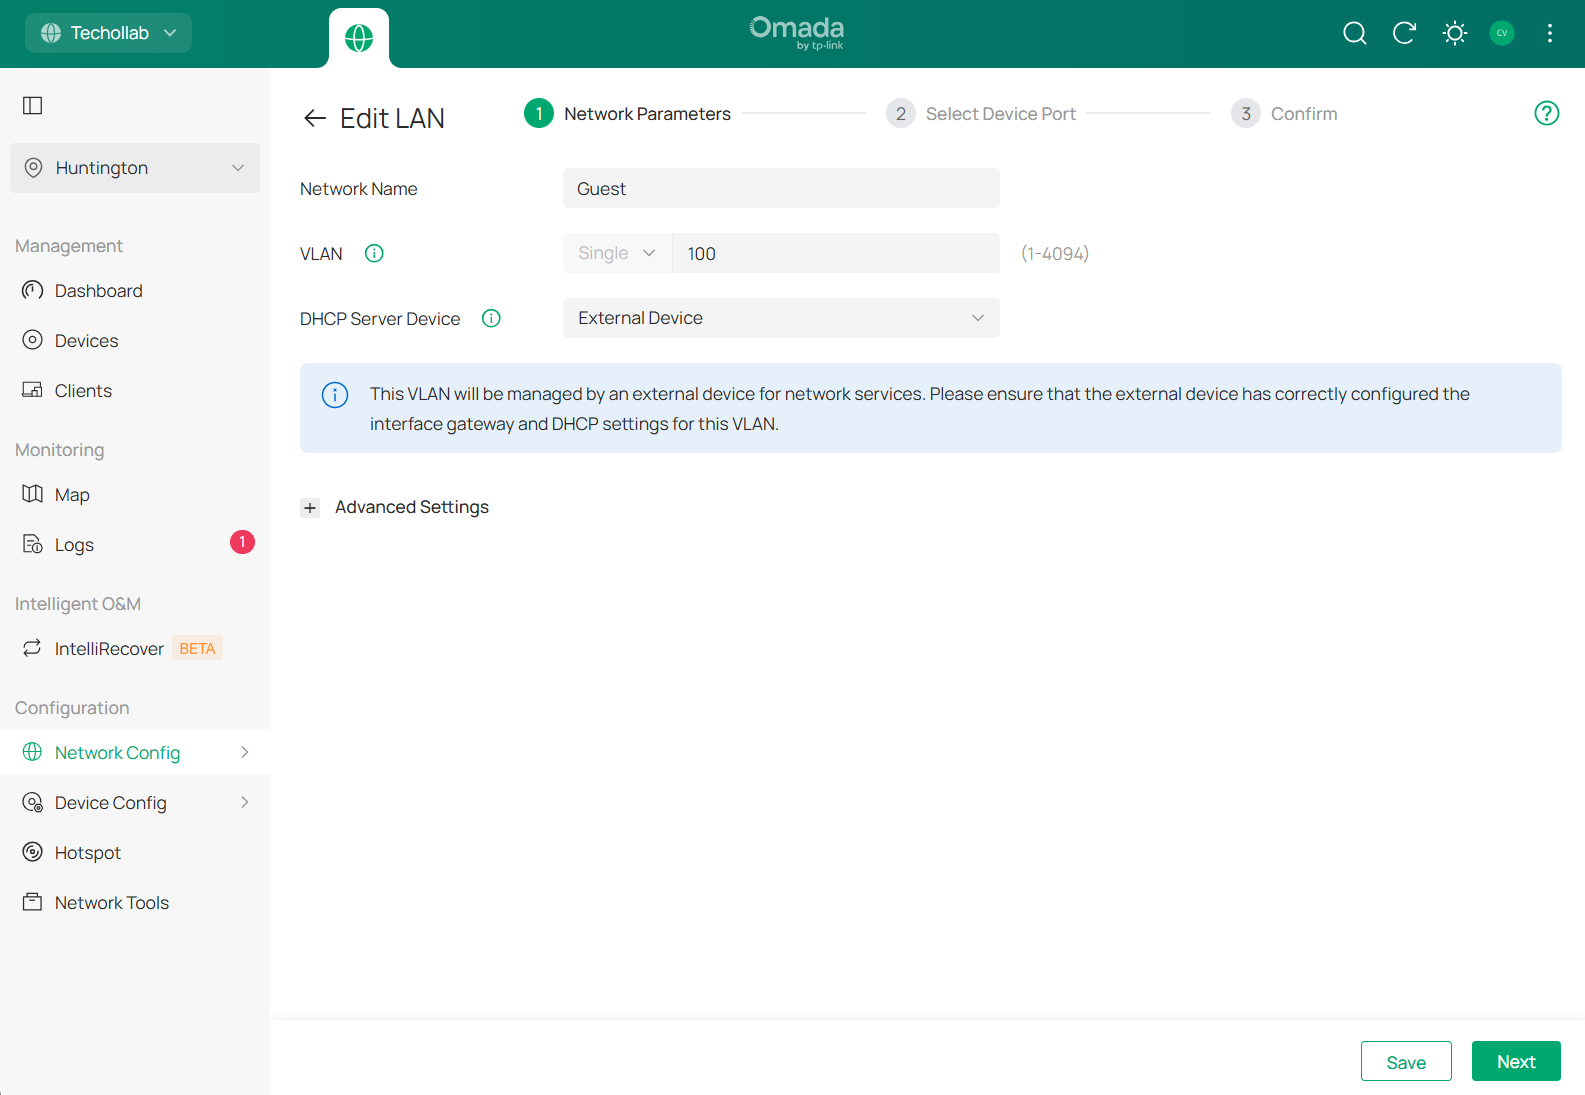
2. Create the SSIDs under Network Config → WLAN
Open Network Config → WLAN → SSID, then add or edit your wireless networks. Set the Wi-Fi name and security options, and assign the matching VLAN: Guest to 100, Staff to 50. Save the settings and check the VLAN column in the SSID list.
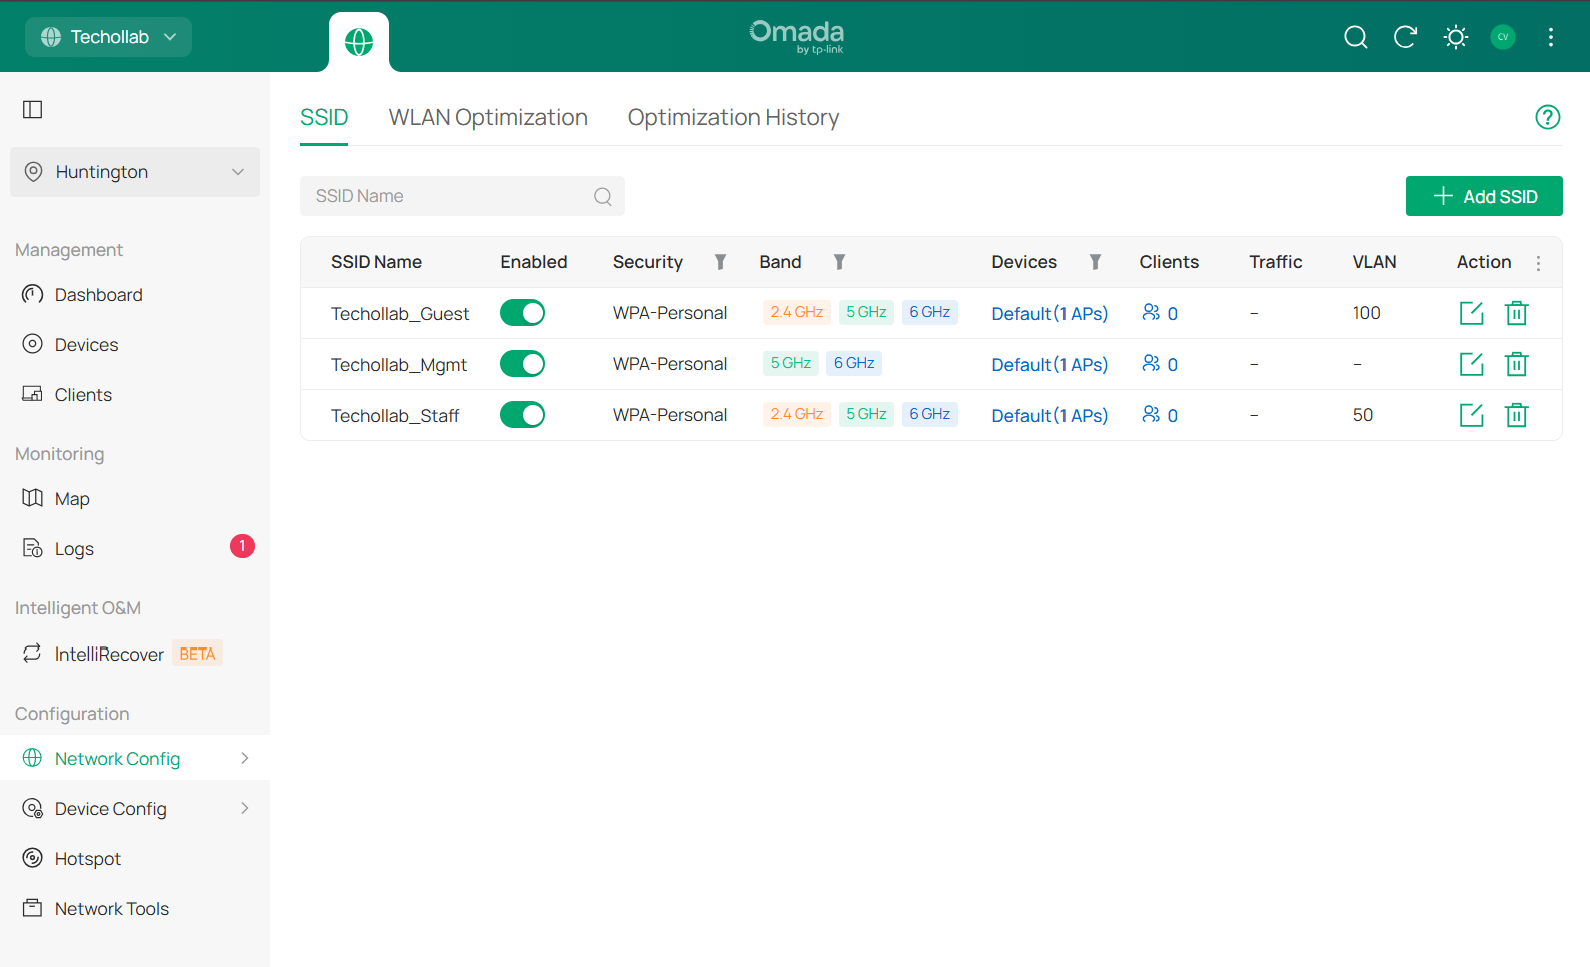
The Staff and Management editors below show where to find the checkbox. Check the same setting on your Guest SSID.
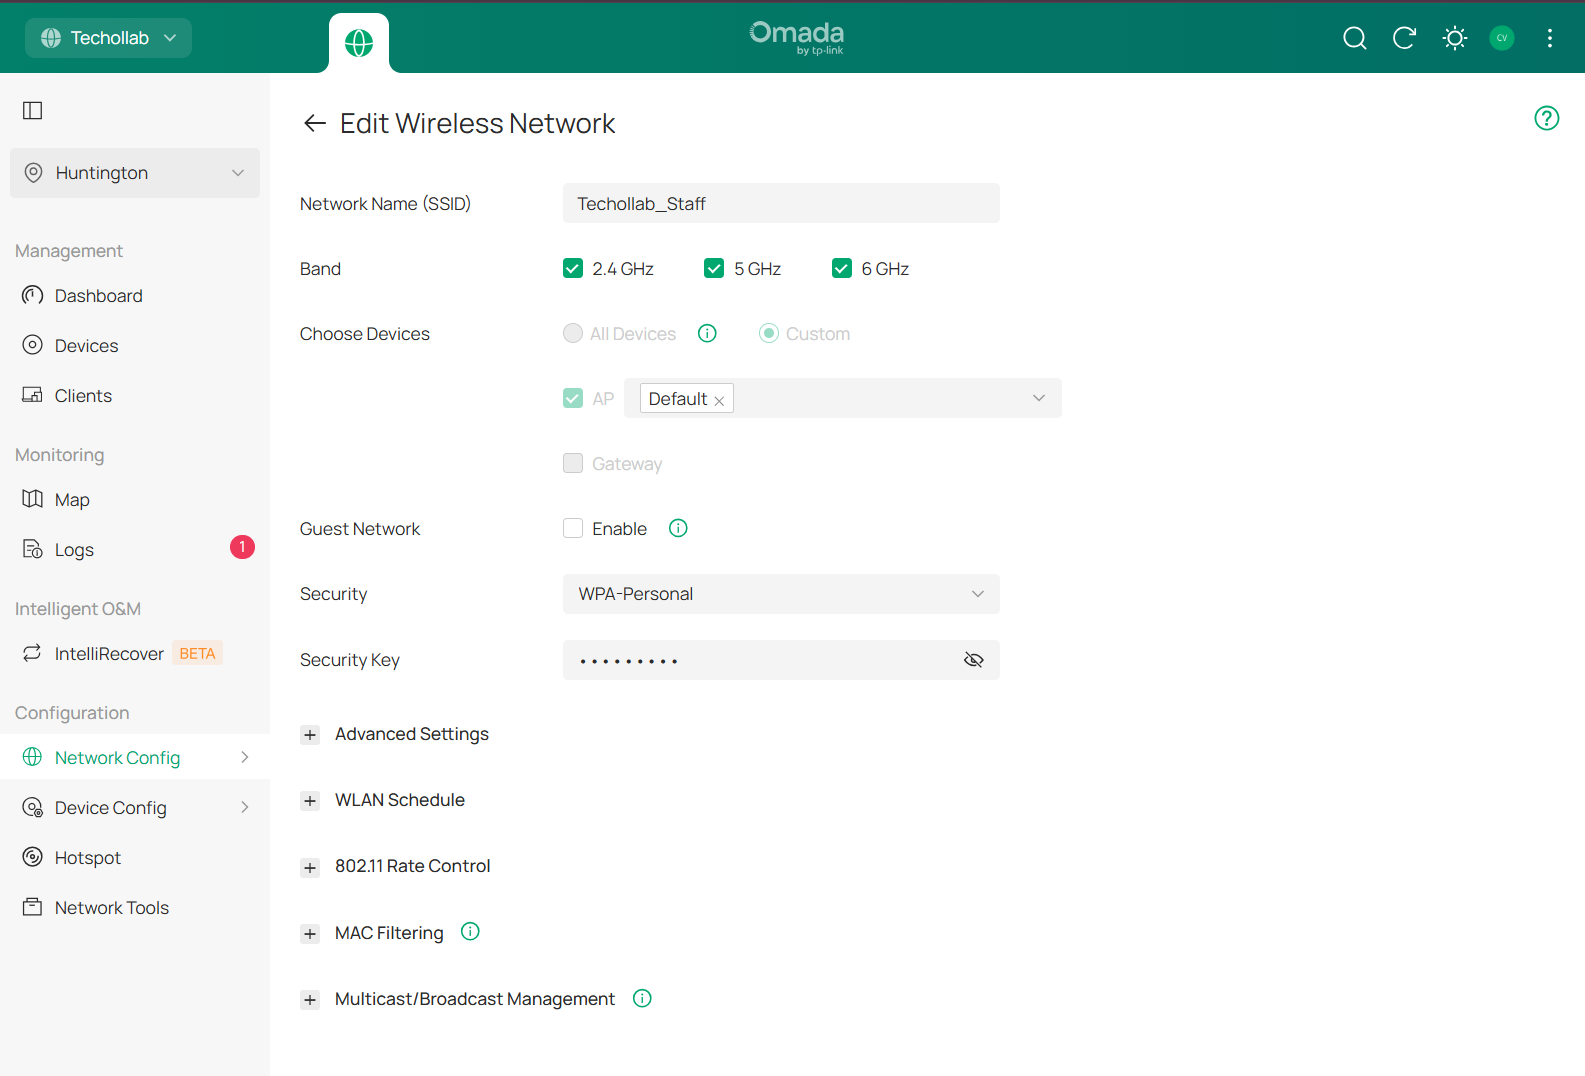
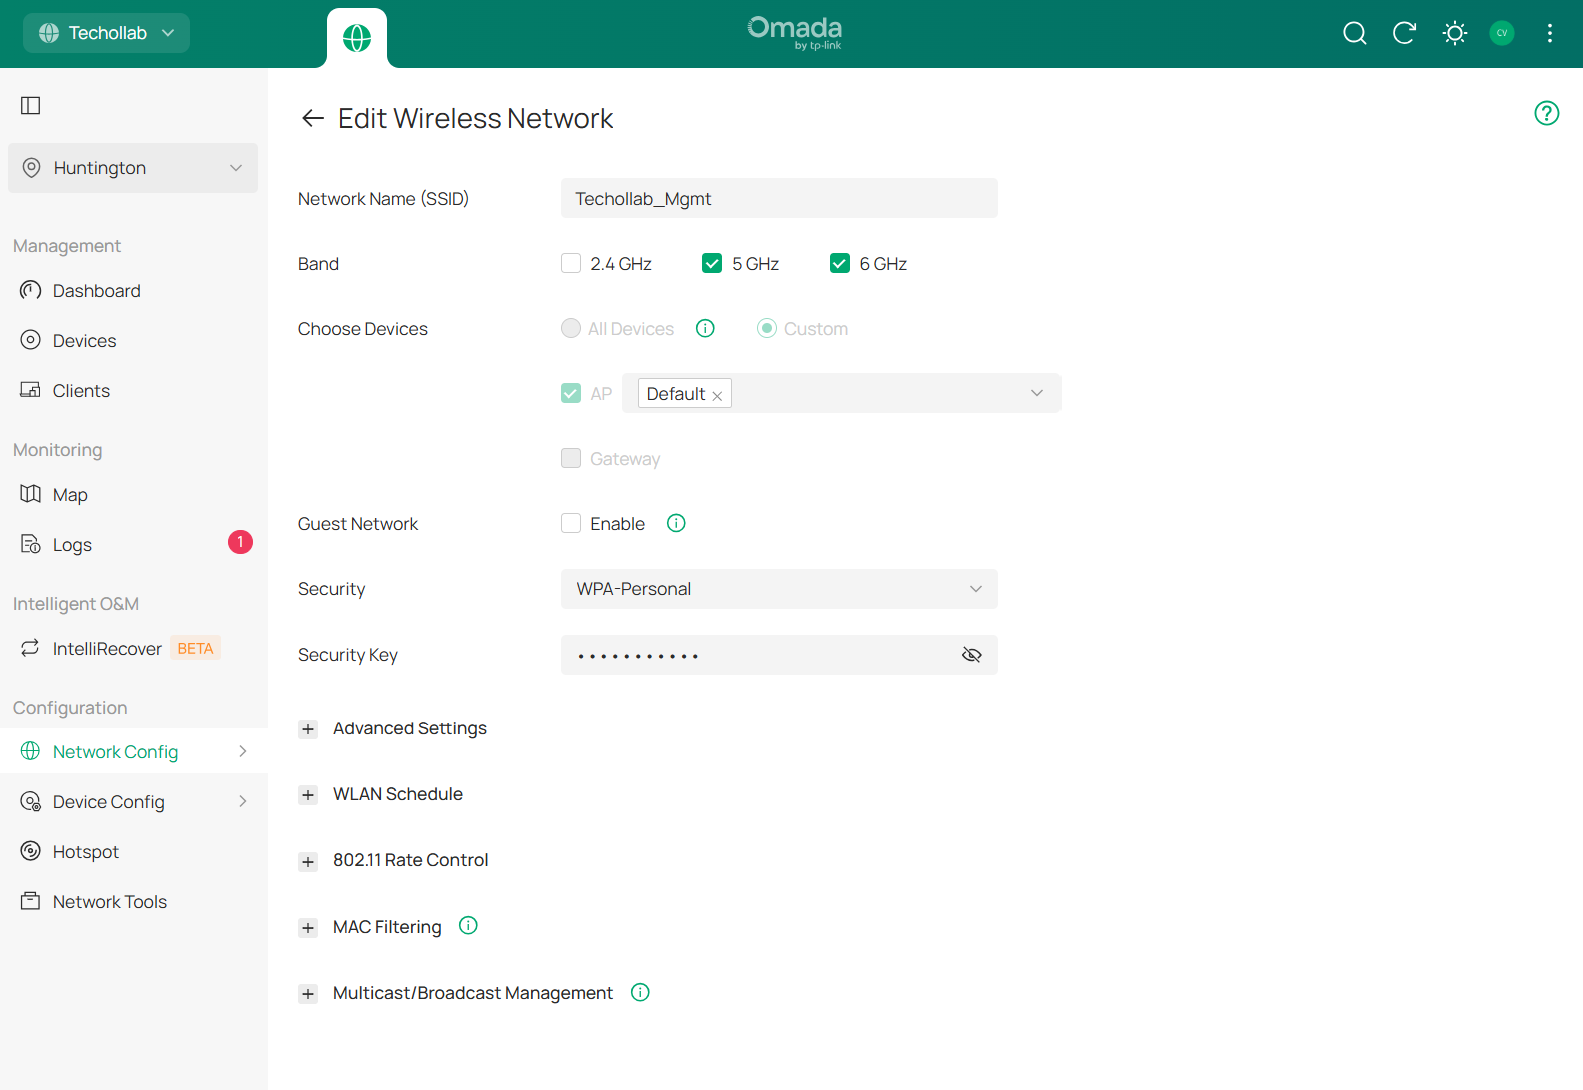
Your Wi-Fi names now have a clear purpose and matching VLAN assignments. Next, give NetCollab the corresponding network details. For version-specific Omada controls, refer to TP-Link’s network configuration guide.
Add the matching network in one NetCollab form
NetCollab brings the network details together in a single form: its purpose, VLAN, gateway and address range. You can save your work as a draft and review it before it affects connected users.
- Click the gear icon at the top right of NetCollab Admin.
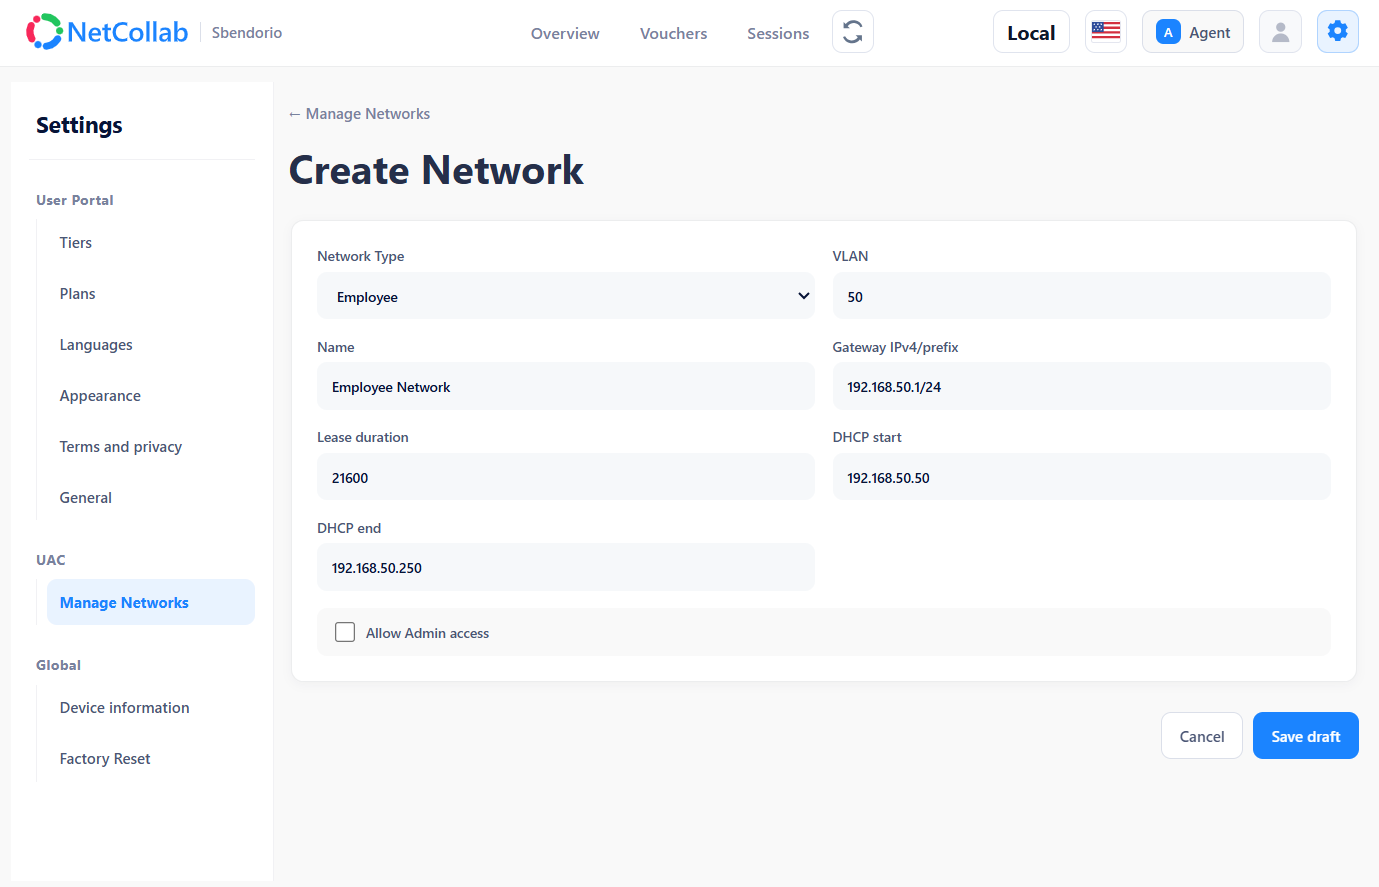
- Open UAC → Manage Networks → Create Network.
- Choose the network type and name, then enter the same VLAN ID used in Omada.
- Enter the gateway IPv4/prefix, DHCP start and end addresses, and lease duration. Choose whether users on this network may access Admin.
- Click Save draft.
The example adds an Employee network on VLAN 50, with gateway 192.168.50.1/24 and DHCP range 192.168.50.50–192.168.50.250. Admin access is unchecked. Use an address range that fits your network and does not overlap another subnet.
The list shows the new Employee network as Pending apply, while Guest VLAN 100 is already applied. Add any other networks you need using the same workflow. A new draft network becomes active when you apply the changes.
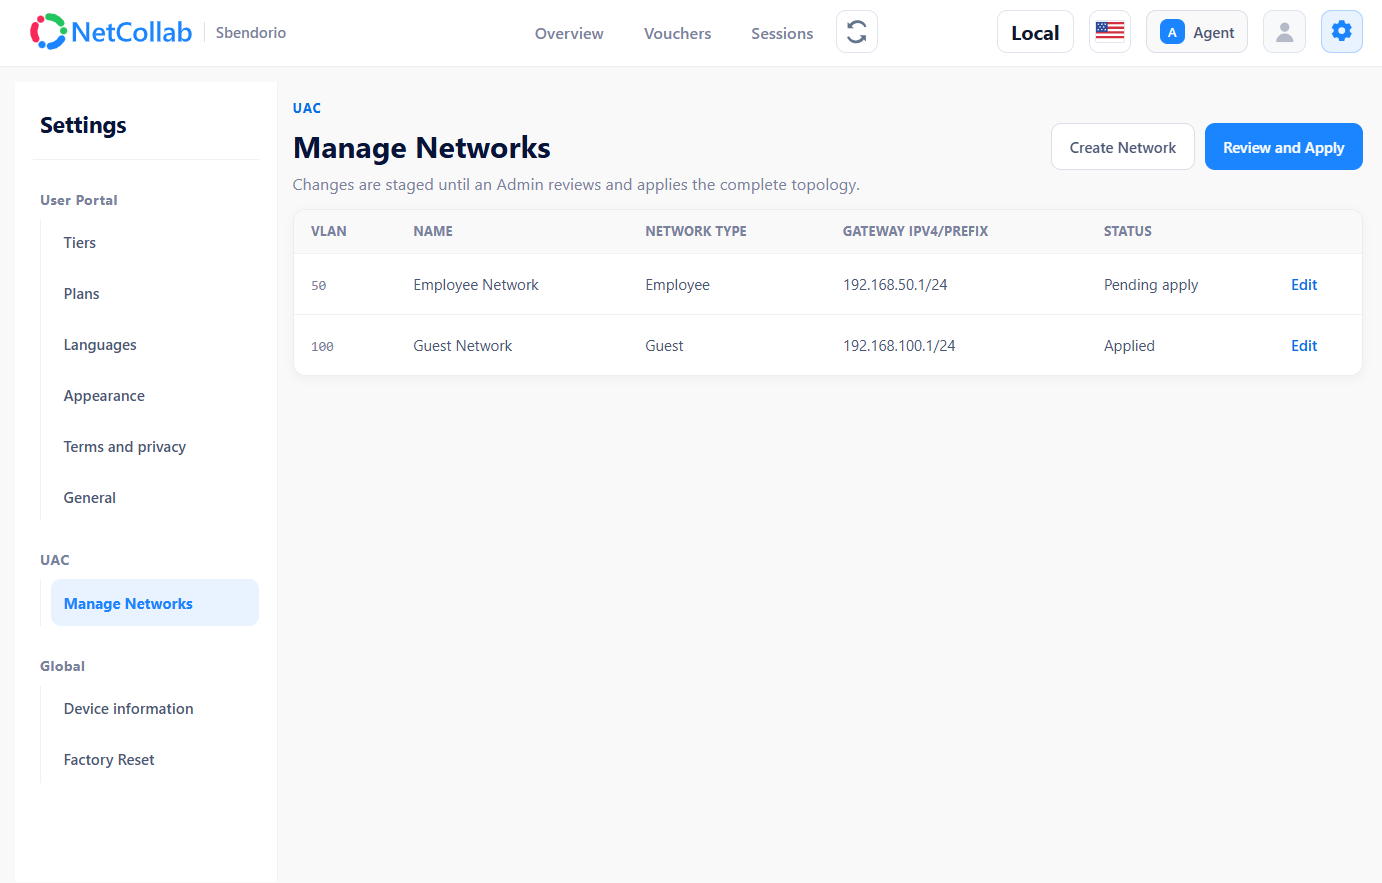
This network structure gives your guest plans a destination: you can make an offer available on Guest while leaving Employee unselected.
Review once, apply, and test the connection
Click Review and Apply to inspect the staged changes together. Check the VLAN IDs, address ranges and access settings, then acknowledge the restart and choose Apply revision.
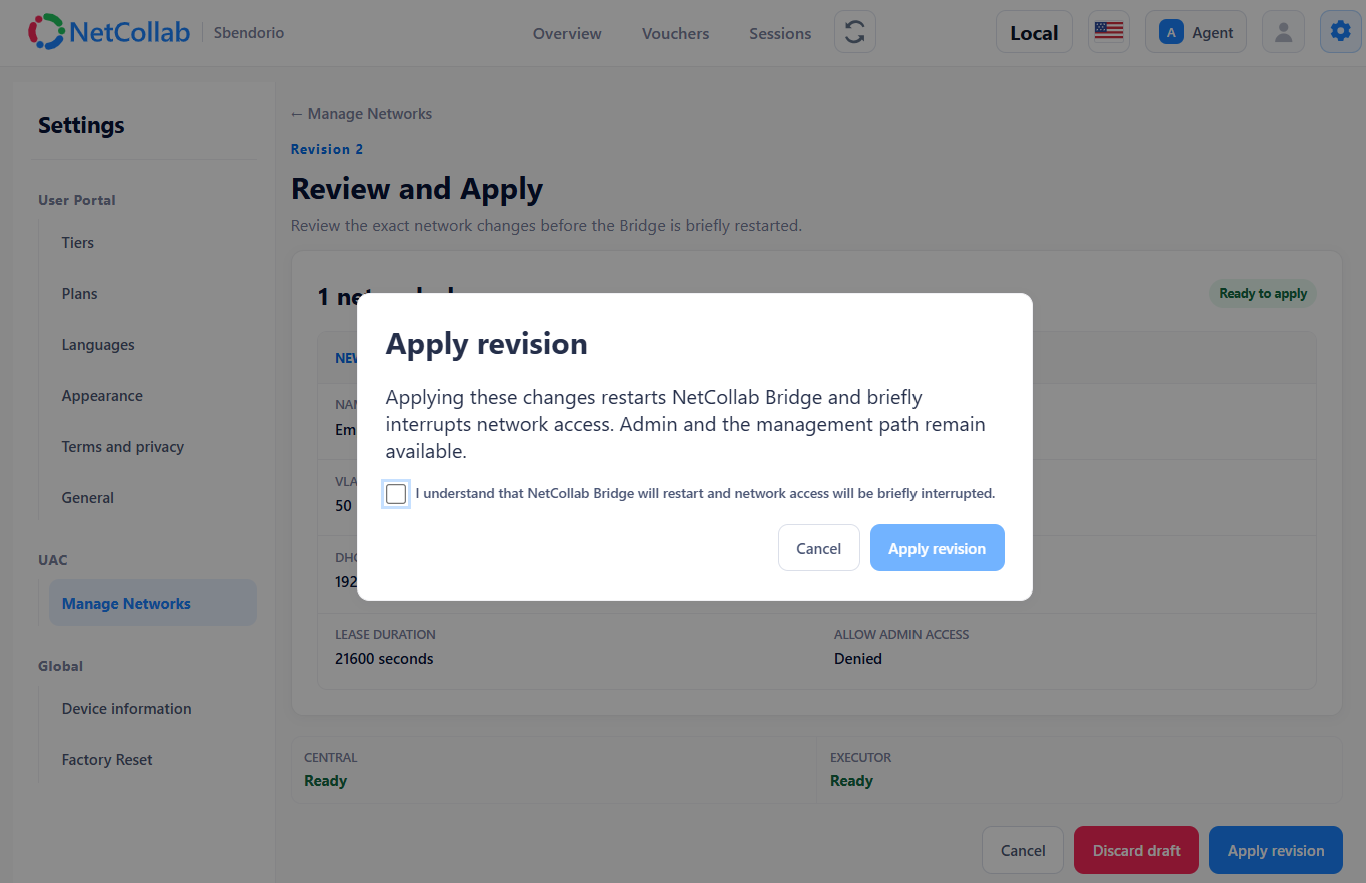
The status view lets you follow validation and network preparation. Wait for a successful result before testing; the screenshot below shows the operation in progress.
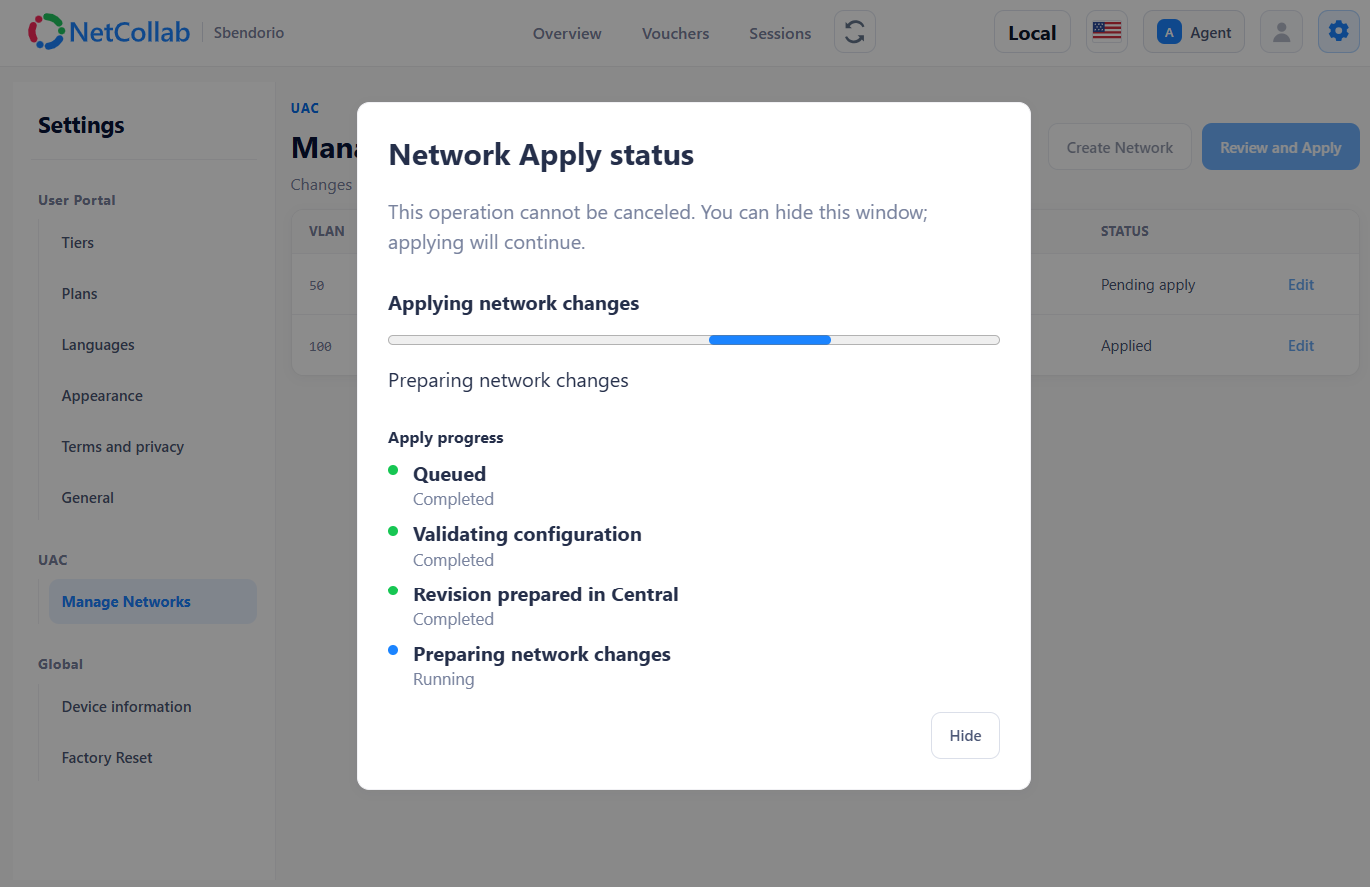
Connect a test device to the intended SSID and confirm it receives an address from that network’s DHCP range and can reach the expected gateway. With the guest portal and plans configured in the next section, test the guest journey too: join Guest Wi-Fi, open the portal, choose an available plan and verify access. Test the Employee network separately according to its intended access rules.
Turn each network into an offer your guests understand
Now you can shape the part guests actually experience: the welcome screen, the available plans and what each plan includes. This is where the same internet connection can support complimentary hospitality, controlled access and paid upgrades.
Build a recognizable welcome
Open Settings → User Portal → Appearance to personalize your captive portal’s logo, colors, typography and imagery. A hotel can carry its visual identity through to the Wi-Fi welcome; a café can make the access offer feel like part of the visit. For international visitors, NetCollab also provides 11 portal languages and AI-assisted plan translation.
Choose a tier, then set the plan’s price and allowances
Use Settings → User Portal → Tiers to define the access policies, then open Plans to package the offer. Select a tier, set the duration and price, and choose download/upload quotas and rates. Together, tiers and plans let you control application access and how much time, data and bandwidth a guest receives.
You choose the commercial objective. A complimentary plan can make basic access available within limits. A paid plan can offer longer access, higher allowances or a different tier. Vouchers and Stripe payments let you connect those offers to a purchase, a stay or an optional upgrade.
Assign the plan to the right networks
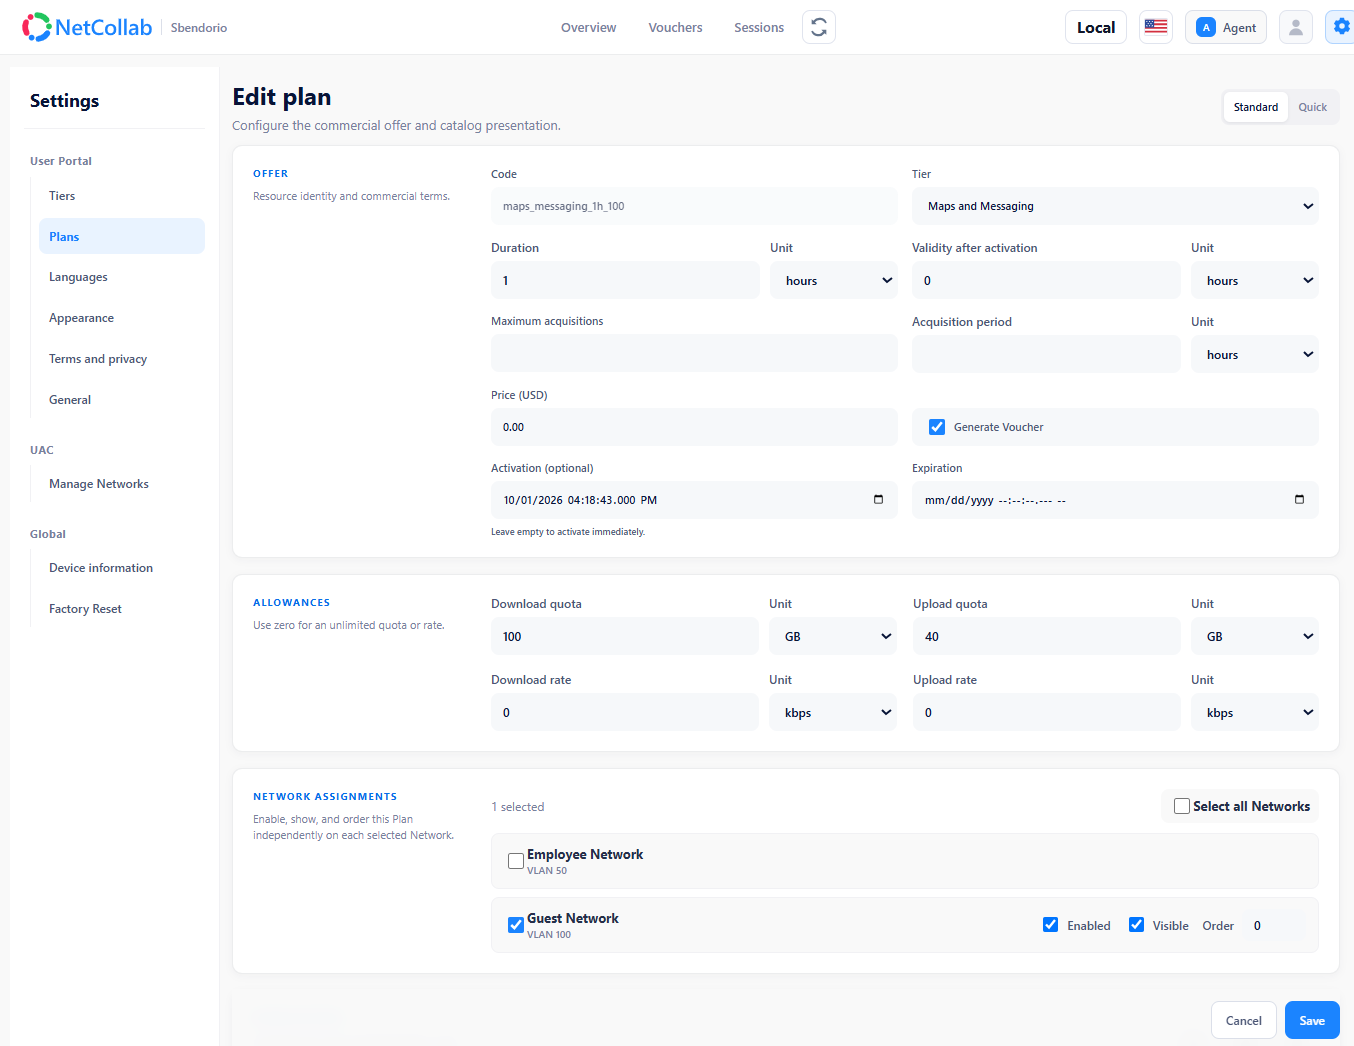
Under Network Assignments, select the networks that should offer this plan. Set Enabled, Visible and the display order for each selected network, then save. Repeat for the other plans you want to offer. You can build different selections for different networks and offer multiple choices on one guest network.
The example below selects the Maps and Messaging tier, one hour of access, a $0.00 price and voucher generation. It assigns the plan to Guest VLAN 100, with Enabled and Visible checked, and leaves Employee VLAN 50 unselected. The pictured quotas are example settings; choose allowances that suit your connection.
Three ways to put that flexibility to work
- Café: make free access part of a purchase. Offer a 30- or 60-minute plan with a staff-issued voucher. Give visitors a useful connection while keeping complimentary access aligned with their visit.
- Hotel: give guests a choice. Offer a complimentary plan for everyday use and a paid plan with higher allowances. Present both on the guest network so guests can choose the offer that fits their stay.
- Remote venue: make limited bandwidth go further. Offer a basic tier for supported messaging and map services, then price broader access separately. Set data and speed allowances around the capacity you actually have.
These are configurable business examples, not fixed packages. You decide the prices and limits. Paid access gives you a way to recover connectivity costs or generate revenue; the offer still needs to fit your customers and available service.
Explore the plan and tier features, compare NetCollab hardware, or talk with us about your venue’s guest Wi-Fi.
Quick answers before you welcome guests
Do I need a separate SSID for every paid plan?
No. Assign several plans to the same NetCollab guest network. Use different SSIDs and VLANs when you need distinct networks, and plans to offer different access choices within them.
Why leave Omada Guest Network disabled?
This walkthrough uses NetCollab UAC for guest access. Omada’s Guest Network checkbox introduces separate behavior that can interfere with this setup. Leave it unchecked on the relevant SSIDs, including the one named Guest.
What if a device joins Wi-Fi but gets no IP address?
Match the Omada SSID’s VLAN ID to the NetCollab network, confirm that the AP and switch uplinks carry that VLAN, and check that the NetCollab revision is applied. Verify the DHCP range and avoid a conflicting DHCP server on the same network.
Why is my plan missing from the guest portal?
Check that the plan is assigned to the network the guest joined, with Enabled and Visible selected. Review its activation and expiration settings, then test the portal again.
What should I test before opening access to customers?
Test each network and the plans it offers. Confirm the portal branding, plan names, prices and limits, then try the voucher or payment journey you intend to provide. Start with a deployment conversation if you would like help choosing hardware and shaping your access offer.